A practical alternative and complement to Security Copilot
I wrote about Alternatives to Microsoft Security Copilot last year and why many organizations are still looking for practical ways to bring AI into their SOC.
That conversation has continued to come up in customer engagements. Some teams do not have access yet. Others are constrained by budget, regional availability, or government environments. In some cases, the organization is not heavily invested in Microsoft security tooling at all.
More recently, I was introduced to several peers during a customer engagement who were exploring similar patterns. That collaboration helped shape the approach in this post.
This article is the first in a short series focused on a simple idea:
You do not need a full platform to start using AI in your SOC. You can start with an API.
In this post, we focus on deploying the Azure AI Foundry foundation and exposing a private LLM API.
In the next parts of the series, we will build on that foundation by integrating the API into:
- Logic Apps & Workbooks
- Azure Functions
- and a lightweight VS Code Python “vibe coding” starter
The goal is to show how quickly this can move from a manual setup to something that is integrated into real SOC workflows.
A Different Starting Point
When most teams think about deploying a private LLM, they picture an internal chatbot. Something that looks and feels like ChatGPT. A popular opensource example is Simple Chat.
That approach works well for exploration. Analysts can ask questions, review results, and iterate.
But in a SOC, much of the work is not exploratory. It is repetitive and structured. Alerts are generated continuously, incidents require triage, and enrichment is expected as part of the process.
Instead of focusing on how to improve the chat experience, it is often more useful to focus on how to process the data automatically before it reaches the analyst.
That is the shift this design is built around.
From Chat to Service
Rather than starting with a conversational interface, this approach builds a backend AI service that can be called programmatically.
That service can be used to:
- summarize incidents
- prioritize alerts
- enrich entities
- generate KQL queries
- provide response guidance grounded on SOPs
It can be called from:
- Sentinel
- third-party SIEM or SOAR platforms
- ITSM systems
- custom applications, including those outside Azure
A chat interface can still be added later if needed. It can even reuse the same model and grounding. But it becomes a consumer of the service, not the foundation.
What We Are Building
At its core, this is an Azure-hosted, multi-purpose LLM service exposed as a private API.
It is not tied to a single interface or workflow. Instead, it acts as a reusable capability that multiple systems can call.
The project you create in Foundry becomes:
- a private API endpoint for your model
- a control layer for how that model behaves
- a container for optional capabilities, including:
- grounding through indexed data
- workflow orchestration
- additional features if needed
The same API can support very different tasks because each request defines its own behavior.
In practice, that means:
- one request can summarize an incident
- another can generate a KQL query
- another can evaluate risk or priority
- another can provide response steps based on SOPs
The model stays the same. The behavior changes based on how the request is constructed.
This is what makes the approach flexible. You are not building a single-purpose solution. You are creating a general-purpose AI service tailored to your environment.
Where Logic Lives
One of the more important shifts in this design is understanding where the logic actually resides.
It is easy to assume that most of the intelligence is configured inside Foundry through projects, flows, or add-ons. In practice, a large portion of the behavior is defined at the time of the API call itself.
Each request can include:
- system instructions that define the role and behavior
- structured input, such as JSON for incidents or enrichment data
- output expectations, including format and level of detail
- parameters that influence consistency and response style
- optional grounding sources, depending on how the request is routed
Because of this, the same model deployment and project can support a wide range of use cases.
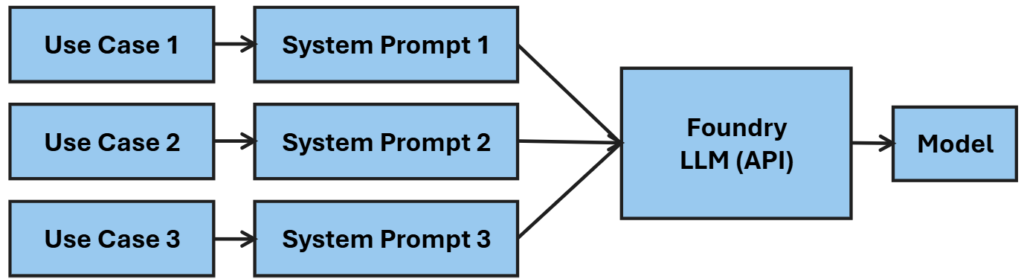
One request might instruct the model to summarize an incident. Another might generate a KQL query or assign a priority. The underlying model does not change. The behavior is shaped by the request.
This is what allows a single API to serve multiple functions without requiring separate deployments.
There are still cases where additional structure is useful. When workflows involve multiple steps, external API calls, or validation and retry logic, that orchestration is better handled outside the model using Functions, Logic Apps, or prompt flow.
A practical way to think about it is:
- use the API request to define behavior and format
- use indexes to provide consistent knowledge
- use workflows to orchestrate multi-step processes
- the model can be changed or upgraded as needed
This balance keeps the design simple while allowing it to scale as requirements grow.
Why Start Manually?
There is a natural tendency to jump straight to deployment scripts. For this scenario, it is worth building once manually.
Doing so makes it clear:
- what the hub actually provisions
- how a project becomes your API boundary
- how model deployment works in practice
- how grounding and access settings behave
Once that is understood, automating the deployment becomes much easier.
Manual Deployment (Step-by-Step)
Follow these steps as a simple recipe.
1. Create a Resource Group
Create a dedicated resource group for this deployment. This keeps everything isolated, simplifies cleanup, and makes it easier to iterate.
2. Create an Azure AI Foundry Hub
Search for Azure AI Foundry and create a new hub.
The hub acts as the parent container for your AI environment. It will automatically create a storage account and a Key Vault, which support data handling and secret management.
During setup, select identity-based storage access and disable shared key access. This establishes a strong default security posture.
Inbound access determines who can call the API and will ultimately be enforced through authentication and networking controls. Leave this as public for now.
Outbound access determines whether the solution can reach external services. Some organizations prefer to disable this initially. In practice, many real use cases will require external enrichment or data sources, so this is often enabled later.
Customer-managed encryption keys are available, but Microsoft-managed encryption is sufficient for most scenarios and avoids additional operational risk. Only use CMK if required.
3. Create a Project
Launch Foundry and create a new project within the hub.
A project represents your AI application boundary and serves as the API surface your systems will call.
You will typically need fewer projects than expected. A single project can support multiple use cases because the behavior is largely defined by the system prompt included in each API request.
Additional projects are only needed when you require separation for security, data, or lifecycle reasons such as development and production environments.
4. Select a Model
Choose a model such as GPT-4 or GPT-5 if available.
Use Microsoft-hosted deployment with the Data zone (Standard) option to keep data within a geographic boundary while still allowing flexibility across regions.
You can change models later, so this decision is not permanent. As new models become available, you can swap them in without rebuilding the project.
It is also possible to use multiple models, but most scenarios do not require it. A single model is typically sufficient, with different behaviors controlled through the API request. Multiple models may make sense if you are optimizing for cost, latency, or specialized capabilities across different workloads.
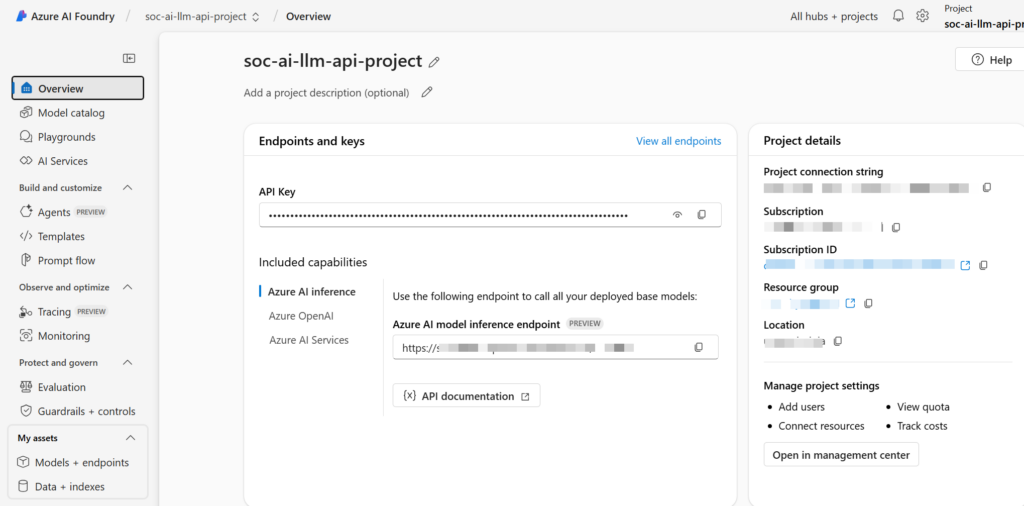
5. Review API Details
After deployment, note the endpoint URI and API key. This is your LLM API.
The hub automatically creates a Key Vault, which can be used to securely store keys and other secrets.
It is worth noting that API keys are still visible to users with appropriate Foundry permissions. For that reason, Managed Identity is the preferred approach when calling the API from Azure services such as Functions or Logic Apps, allowing you to avoid key management entirely.
API keys remain useful for testing and for integrations outside Azure where Managed Identity is not available.
Grounding in Practice
Grounding is flexible and can be added as needed.
You can:
- upload documents directly
- connect to blob storage
- create and attach indexes, including Azure AI Search
- connect to sources such as SharePoint
For most scenarios, indexed data provides the best balance of performance and relevance.
Web search is available through agent-based capabilities, which are not currently available in government environments.
External data sources, such as threat intelligence APIs, are typically integrated through workflows or application logic and then passed to the model as context.
We will walk through practical grounding and enrichment examples in the next parts of this series.
Using the Playground for Prompt and API Design
Before moving into code or workflows, the Azure AI Foundry playground is a practical place to experiment with system prompts, refine request structure, and validate outputs without building API calls.
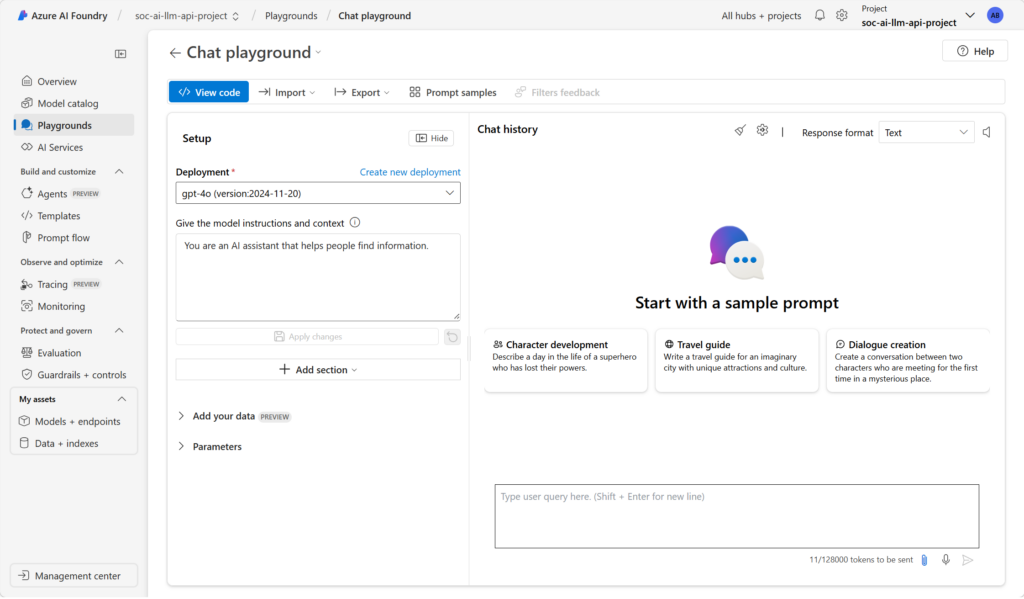
This is where early iteration should happen. You can shape the system prompt, test inputs, and adjust responses until behavior is consistent. It is also useful for validating grounding, confirming that connected data sources return relevant context and are reflected correctly in responses.
The playground allows you to test different models and parameters. Lower temperature values produce more deterministic outputs suited for SOC tasks like query generation or response guidance, while higher values can support summarization or enrichment scenarios.
Once the interaction is stable, the same system prompt, message structure, and parameters can be carried into an API request with minimal changes. Treat the playground as a staging area to refine both prompt design and grounding before integrating with Logic Apps, Functions, or Sentinel Workbooks.
Closing Thought
You now have a low-cost, Azure-hosted LLM. Starting with an API changes how AI is applied in the SOC.
This is the foundation. In the next parts of the series, we will build on it by wiring this API into Logic Apps, Workbooks, Functions, and a simple development starter to show how quickly this becomes usable in real scenarios.